
How Beginners Can Realistically Start with Photo to Video AI
Published:
AI video used to mean budgets, crews, and long render queues. Now a still photo plus a short motion prompt can become a usable clip in minutes. That shift is exciting—and easy to misuse if you expect Hollywood output on the first click.
This post is a practical starter path for photo to video and broader AI Video Generator workflows: what to expect, how to start small, and how to improve without burning credits on guesswork.
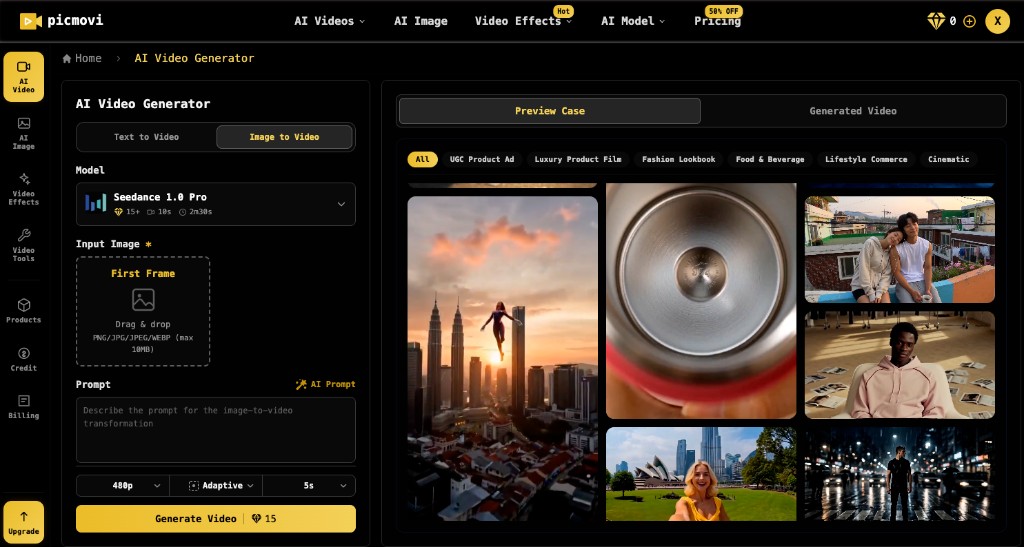
Photo to video vs. a full AI Video Generator
Photo to video (also called image to video) starts from a still. You lock identity, product, or framing with a first frame, then describe camera move, subject action, and mood. It shines when you already have brand assets and only need motion.
An AI Video Generator is the wider studio: text to video for scenes that do not exist yet, image to video when a photo is the anchor, plus shared controls for model, resolution, aspect ratio, and duration. Tools like picmovi gather engines such as Seedance, Veo, Kling, Wan, and Hailuo in one credit wallet so you can compare takes instead of juggling five logins.
AI does not replace taste. It shortens the loop between idea and draft—more like editing a paragraph than booking a reshoot.
What first-time users usually hit
1. Too many dials
Model names, durations, ratios, first/last frame toggles—beginners often freeze on “which model?” instead of “what motion do I want?” Treat models as lenses: some favor fast iteration, some photoreal look, some fluid action. Learn them by running the same photo twice, not by reading a feature matrix once.
2. Trial and error is normal
Your first clip may keep the face or product but drift the camera or overdo motion. That is expected. Camera language (“slow push-in,” “gentle parallax,” “subject turns toward light”) beats vague wishes (“make it cinematic”). Plan on two or three regenerations before a keepable take.
3. Wrong scale of ambition
These tools are strong at short, purposeful clips—not a feature film on day one. Aim for 5–15 seconds that serve a post, ad, or product loop. Captions, crop, and cut points still need a human eye.
A beginner workflow in five steps
Step 1: Write one goal sentence
Ask: who is this for, and where will it play?
- Product or brand still → image to video / photo to video
- Scene that does not exist yet → text to video
- Both ideation and assets → stay in one AI Video Generator studio so you can switch modes without leaving
Step 2: Start with one photo, one short clip
- Open a photo to video or image to video tool.
- Upload a clear first frame (good light, subject not awkwardly cropped).
- Write a short motion prompt: camera + action + mood.
- Match aspect ratio to the channel (9:16, 16:9, or 1:1).
- Generate once, watch once, note one fix.
Small starts teach you how the tool behaves and protect your credits.
Step 3: Change one variable at a time
- Same photo, tighter prompt
- Same prompt, different model
- On supported models, add a last frame for product loops that open and close on chosen compositions
Keep the versions you like in history so you do not re-upload every experiment.
Step 4: Compare two models on the same still
Ask three questions:
- Which holds face or product identity better?
- Which motion feels natural for the platform?
- Which got to “good enough” with fewer credits?
You are building a personal shortlist, not hunting perfection.
Step 5: Keep a three-bullet postmortem
What worked, what broke, what to try next. A week of notes beats a stack of generic tutorials. AI speeds generation; your notes speed taste.
Practical tips
- Budget credits for learning, not only for “final” posts. Most people improve between the second and fifth export.
- Name camera, action, and constraints in the prompt. Example: “Subtle handheld feel, product rotates slowly on table, no text, no morphing logos.”
- Reverse-engineer examples, then swap in your photo and brand rules—do not paste someone else’s story.
- Collaborate, do not abdicate. You bring goal, taste, and rights to the source photo. photo to video ai brings draft motion. Together you get something you can caption, cut, or A/B test.
- Expand slowly: photo to video first, then text to video, then longer clips or first/last-frame control.
Closing
Adopting photo to video and an AI Video Generator is a practice, not a single breakthrough click. Start with one photo and one clear goal. Expect iteration. Compare models. Keep notes. After a few sessions, the studio feels less like a cockpit and more like a sketchpad.
AI does not replace creativity—it shortens the distance from idea to a visible draft. That is enough to ship better social clips, product motion, and early storyboards with expectations that match how the tech actually works today.